Database Updates with Liquibase
- Introduction
- What is Liquibase?
- Example Database Update
- MySQL limitations
- Percona
- liquibase-percona
- Complete Example
- Database refactoring
- Pitfalls and surprises
- Summary
- References
How to combine Liquibase and Percona Toolkit to apply zero-downtime database updates.
Introduction
Assume you are providing a service in the internets. It’s probably a service in “the cloud” and it is expected to be available 24/7. There is no downtime. Since it is a service that is used around the world, there is also no time window with low usage. The service is used always, there is no maintenance window.
Now providing a useful service with good user experience means to store some data. Assume you have chosen a standard relational database software - namely MySQL. The service started out small, so MySQL was the obvious choice back then. But over time, the data accumulated, lots of users are using your service and now you are managing a huge database. Think of huge in millions and millions of rows per table.
You’ll notice that changing the data structure (the database schema) of such big tables takes time.
During the time, a ALTER TABLE statement is executed, other database queries might be slower or be even blocked
completely. This is then affecting the availability of your service: Remember, you have a 24/7 service. Having a slow
database now cascades back through all layers and can easily lead to an outage of your entire service.
But there are some interesting techniques that might meet these challenges.
What is Liquibase?
Let’s start at the very beginning. Database schema updates are a very frequent task at the early stages of a service development. There are a couple of solutions. If you use Java, one way could be to use JPA (Java Persistence API) and the ability of some implementations (like Hibernate) to generate the DDL statements to create all the tables when the service is started. These solutions can also update the schema to match the current code. This is a great solution for development, but in production you typically want to have more control. You don’t want to loose your data just because a service restarted and thought it needed to drop and recreate the tables. Often the database user used for the service in production doesn’t even have permission to change the schema.
Typically the scripts to create the necessary tables for the service are externalized. That makes it possible to run them independently of the service. The scripts are also under version control and are ideally used and tested during development. The scripts can also contain incremental updates such as adding a new column instead of creating the whole schema from scratch, allowing to update the database without loosing data.
One tool to manage database schema updates, is Liquibase. It is an open source tool with a free Community Edition (Apache License) and a commercial Pro Edition. You can write your database update scripts in various formats such as XML, YAML, JSON or even plain SQL. Liquibase provides tooling around the tasks to apply the schema updates against databases, automatically figuring out which part of the script has already been executed and only executing the missing parts to update the schema. Liquibase is written in Java and supports many database systems like MySQL, PostgreSQL, Oracle, DB2 and many others.
Besides Liquibase there are other tools for the same task, e.g. Flyway.
Sample changelog
The database scripts in Liquibase are called “changelog”. One changelog can contain many change sets. Each change
set can contain one or more statements to alter the schema. Here is a simple example which just creates the table
called person with two columns:
<databaseChangeLog>
    <changeSet id="1" author="JonDoe">
        <createTable tableName="person">
            <column name="id" type="int" autoIncrement="true">
                <constraints primaryKey="true"/>
            </column>
            <column name="address" type="varchar(255)">
                <constraints nullable="false" />
            </column>
        </createTable>
    </changeSet>

    <changeSet id="2" author="JonDoe">
        ...
    </changeSet>
</databaseChangeLog>
Liquibase Features
Liquibase has many features. As we saw, a change log contains change sets and each change set contains one or more
change types. Besides createTable there are many other types, such as
- addColumn
- createIndex
- dropProcedure
- loadData
- renameSequence
- …
A complete list is provided in the documentation under Liquibase Change Types.
A changelog can be applied by Liquibase. This means, that all change sets are applied, that have not been executed yet. But Liquibase also supports rollback. Most change types know what statements to execute in order to undo the change. So you can use the same changelog to update the database and also to rollback the changes if necessary.
Liquibase provides a couple of commands that “execute” the changelog. To apply all the change sets in the changelog
you’ll use the update command. The most important commands are
- update
- updateSQL
- rollback
- validate
- tag
An interesting command is updateSQL, which doesn’t immediately execute the SQL statements but creates another SQL
script that can be reviewed. This is kind of a “dry-run” mode.
A complete list of all commands are provided in the documentation under Liquibase Commands.
Liquibase itself is highly extensible through plugins. Plugins can provide support for other DBMS which are not supported out of the box. Plugins can also provide additional change types or modify the behavior of existing change types.
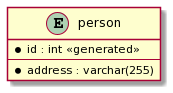
Example Database Update
Here is an example of a simple schema: It has one table called “person”.
Now we want to add an additional column to actually store the name of the person we have in our database:
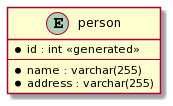
The XML changelog for Liquibase looks like this:
<changeSet id="2" author="JonDoe">
    <addColumn tableName="person">
        <column name="name" type="varchar(50)" afterColumn="id" />
    </addColumn>
</changeSet>
Note: This is only an excerpt of the changelog and only shows the additional change set.
Once we have created the changelog and added this change set, we can call the Liquibase command “update”:
$ liquibase \
    --url="jdbc:mysql://mysql-tests:3306/lbtest" \
    --changeLogFile=sample-changelog.xml \
    --username=root --password=my-secret-pw \
    --logLevel=info \
    update

Starting Liquibase at 08:01:12 (version 4.3.5 #62 built at 2021-04-29 18:31+0000)
INFO [liquibase.lockservice] Successfully acquired change log lock
INFO [liquibase.changelog] Creating database history table with name: lbtest.DATABASECHANGELOG
INFO [liquibase.changelog] Reading from lbtest.DATABASECHANGELOG
INFO [liquibase.lockservice] Successfully released change log lock
INFO [liquibase.lockservice] Successfully acquired change log lock
INFO [liquibase.changelog] Table person created
INFO [liquibase.changelog] ChangeSet sample-changelog.xml::1::JonDoe ran successfully in 176ms
INFO [liquibase.changelog] Columns name(varchar(50)) added to person
INFO [liquibase.changelog] ChangeSet sample-changelog.xml::2::JonDoe ran successfully in 108ms
INFO [liquibase.lockservice] Successfully released change log lock
Liquibase: Update has been successful.
Now Liquibase was executed against the database lbtest on the MySQL database server “mysql-tests”.
It created one additional table with the name “DATABASECHANGELOG”. This is where Liquibase stores
the information which change sets have already been applied. If we would run now the “update” command once again
Liquibase would be able to figure out that the database is already up-to-date and wouldn’t run
any SQL statements.
Here’s the database “history” table (SELECT * FROM DATABASECHANGELOG):
| ID | AUTHOR | FILENAME | DATE | ORDER | MD5SUM | DESCRIPTION |
|---|---|---|---|---|---|---|
| 1 | JonDoe | sample-changelog.xml | 2021-06-25 08:01:14 | 1 | 8:ae9da3… | createTable tableName=person |
| 2 | JonDoe | sample-changelog.xml | 2021-06-25 08:01:14 | 2 | 8:389c0c… | addColumn tableName=person |
Liquibase also stores a checksum of the change set. That way it can figure out if the changelog file has been modified after it was applied to the database. In that case, Liquibase would abort the update, as this means that the database potentially is in a different state than the changelog and any change set that follows might fail.
There are also some commands to manage this changelog table, e.g. validate or clear-checksums.
MySQL limitations
Back to the problem that appears when you have very big MySQL databases. Note that all the following statements are about the InnoDB engine. Other storage engines might behave differently. And many limitations were problems in the past and today’s versions have fixed these limitations. But not all.
In general, InnoDB started to support a mechanism called “Online DDL” a while ago. This means, that you can run DDL statements like adding a column while still having the database available for queries. You don’t need to take your service offline to do the database updates - hence it’s called “online”.
The online DDL support has been added with MySQL 5.6 and has been improved over time. Since then you can
specify an algorithm and a locking mode for some ALTER TABLE statements. E.g. using ALGORITHM=INPLACE, LOCK=NONE
would be already all you need to have a zero-downtime schema update. But it’s not supported for all
schema modifications.
Here’s a short summary:
- MySQL 5.6.17 (2012): https://dev.mysql.com/doc/refman/5.6/en/innodb-online-ddl.html - some
ALTER TABLEstatements are supported (e.g. adding secondary index) - MySQL 5.7 (2015): https://dev.mysql.com/doc/refman/5.7/en/innodb-online-ddl.html - varchar column size can be
changed with INPLACE under certain conditions. E.g. a column smaller than 256 bytes cannot be increased to
a column with more than 256 bytes. In that case, the whole table needs to be copied (
ALGORITHM=COPY). Decreasing the size of a varchar column always requires a table copy. While the table is copied, concurrent DML statements are not allowed, effectively taking the database offline during the copy. - MySQL 8.0.12 (2018): https://dev.mysql.com/doc/refman/8.0/en/innodb-online-ddl.html - now
ALGORITHM=INSTANTis added. You can now add new columns in online mode. But only if the new column is added at the end as the last column. - MySQL 8.0.28 (2022): https://dev.mysql.com/doc/relnotes/mysql/8.0/en/news-8-0-28.html#mysqld-8-0-28-feature -
ALGORITHM=INSTANTis supported for renaming columns (as long as they are not referenced from other tables). - MySQL 8.0.29 (2022): https://dev.mysql.com/doc/relnotes/mysql/8.0/en/news-8-0-29.html#mysqld-8-0-29-feature - An instantly added column can be added to any position in the table. Also a column can be dropped now in online mode.
Where’s the problem? e.g. addColumn
So, if all we want is adding a new column - is the problem solved already? It gets quiet specific sometimes. The new algorithm “INPLACE” has also some limitations:
Tables created before MySQL 5.6 that include temporal columns […] do not support ALGORITHM=INPLACE
If you have an older service where you maintained your database and correctly updated always to the latest MySQL server version, you might still not be able to use the new online DDL features. It is not that simple… You might still need to take your service offline for a while to rebuild your tables to be able to use all features of the new MySQL version.
There is also another problem. Such an online DDL operation - although not blocking any concurrent DML statements - still needs I/O and processing power and probably makes the whole system a bit slower. In the documentation this is described with the following sentence:
There is no mechanism to pause an online DDL operation or to throttle I/O or CPU usage for an online DDL operation.
So, once you issued the DDL command, you can’t pause. If it takes 2 days to complete the operation, you can’t stretch it to give the “normal” DML operations priority. There is no control mechanism. This also affects replication - it might cause big replication lags.
In summary
In summary MySQL might already support all the online DDL features you need. It seems to be constantly improved. However, locking is still often required. Effectively this means, that the database is in readonly mode and no concurrent DML statements can be executed.
Another big issue to look after is replication: Online DDL has an impact on replications, because the online DDL statement needs to have been finished on the master in order to be replicated on the slave (the slave will then execute it again). Concurrent DML statements will only be replicated after the online DDL has been done.
Long running online DDL operations can cause replication lag. An online DDL operation must finish running on the source before it is run on the replica. Also, DML that was processed concurrently on the source is only processed on the replica after the DDL operation on the replica is completed.
(See https://dev.mysql.com/doc/refman/8.0/en/innodb-online-ddl-limitations.html)
See also https://medium.com/practo-engineering/mysql-zero-downtime-schema-update-without-algorithm-inplace-fd427ec5b681 for an example of the limitation.
Percona
We have seen, there are still some limitations when trying to do zero downtime database schema updates. But luckily, there is also a solution - introducing “Percona”:
Percona (https://www.percona.com/) is a company providing database support. In their own words, they are the “Unbiased Open Source Database Experts”. For example, they provide their own optimized MySQL fork, the Percona Server for MySQL. It is a drop-in replacement for MySQL and fully compatible. In includes an improved version of the InnoDB storage engine called “Percona XtraDB”. According to Percona, the whole package is optimized to scale better and overcome some of the limitations of InnoDB.
They of course offer also paid support for anything around databases - not only MySQL, but also MongoDB and PostgreSQL.
They also provide the Percona Toolkit. This contains
“Command-line tools for common MySQL database administration tasks”. It’s basically a bunch of Perl
scripts and one of the scripts is called pt-online-schema-change. It allows to “ALTER tables without locking them”.
The documentation of the tool can be found here:
https://docs.percona.com/percona-toolkit/pt-online-schema-change.html
The latest version is 3.5.0, released in November 2022. See the release notes for details.
pt-osc - How does it work?
pt-online-schema-change (or short “pt-osc”) performs a non-locking database update using triggers. There are several steps necessary:
- An empty temporary table is created. This table has all the schema changes applied, e.g. added or dropped columns.
- Then the data is copied in chunks by the tool into this temporary table. You can control the chunk size, the speed and therefore the load onto your database. There is also the possibility to pause the copy process and resume.
- In order to also get hold of any newly created, deleted or updated rows, that are created in the original table, triggers are used. These apply the same updates to the temporary table, so that no updates are lost. The tool automatically creates these triggers.
- Once all rows have been copied the original and the temporary tables are renamed using
RENAME TABLE. This is an atomic operation. Afterwards the original table is dropped.
pt-osc has its own limitations:
-
Since it needs to create triggers in order to synchronize the tables while the copy is in progress, this means, that pt-online-schema-change cannot be used, if the table already uses triggers.
In some scenarios it is still possible: Since MySQL 5.7.2 it is possible to have multiple triggers at a table with the same event. pt-osc with the option
--preserve-triggerscan then still be used, as long as no column is modified that is used in the original triggers. -
The table you want to modify usually needs to have a primary key. The delete trigger that pt-osc is creating uses the primary key to identify the row to delete in the temporary table.
More about the functionality and specific edge cases can be read in the documentation of the tool:
https://docs.percona.com/percona-toolkit/pt-online-schema-change.html#description
Here’s an old flow chart from 2014 which guides you on how to perform a schema update and when to use pt-online-schema-update or not. Since it’s old, it doesn’t consider the latest improvements in MySQL itself which sometimes make it unnecessary to use pt-osc. It’s still interesting to see some of the decision points:
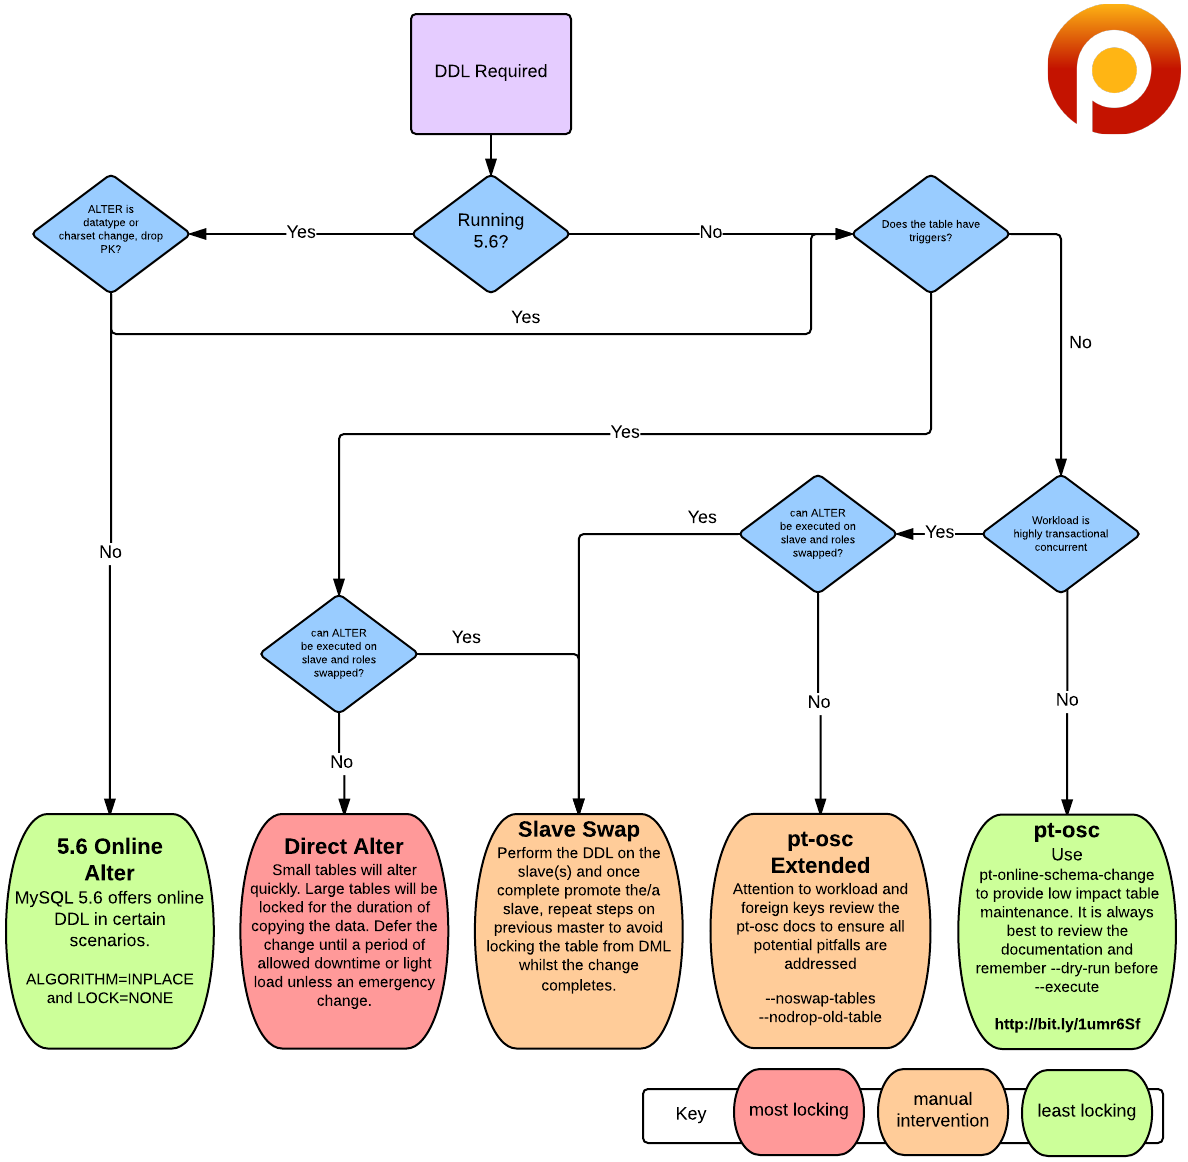
Source: https://www.percona.com/blog/2014/11/18/avoiding-mysql-alter-table-downtime/
Example pt-osc
Now let’s see pt-online-schema-change in action. We’ll add a new column “name” in the middle of the table (after “id”) in a non-blocking way. Since it’s a Perl script, it uses the Perl Database Interface (DBI) and you need to specify the database connection with a DSN (Data Source Name). For MySQL, you’ll need to have the driver “DBD::mysql” installed. The tool will use its own connection to the database.
$ pt-online-schema-change \
    --alter="ADD COLUMN name VARCHAR(50) NOT NULL AFTER id" \
    --password=*** \
    --execute \
    h=mysql-tests,P=3306,u=root,D=lbtest,t=person
No slaves found.  See --recursion-method if host 906d5fc1ad26 has slaves.
Not checking slave lag because no slaves were found and --check-slave-lag was not specified.
Operation, tries, wait:
  analyze_table, 10, 1
  copy_rows, 10, 0.25
  create_triggers, 10, 1
  drop_triggers, 10, 1
  swap_tables, 10, 1
  update_foreign_keys, 10, 1
Altering `lbtest`.`person`...
Creating new table...
Created new table lbtest._person_new OK.
Altering new table...
Altered `lbtest`.`_person_new` OK.
2022-10-01T13:49:20 Creating triggers...
2022-10-01T13:49:20 Created triggers OK.
2022-10-01T13:49:20 Copying approximately 1 rows...
2022-10-01T13:49:20 Copied rows OK.
2022-10-01T13:49:20 Analyzing new table...
2022-10-01T13:49:21 Swapping tables...
2022-10-01T13:49:21 Swapped original and new tables OK.
2022-10-01T13:49:21 Dropping old table...
2022-10-01T13:49:21 Dropped old table `lbtest`.`_person_old` OK.
2022-10-01T13:49:21 Dropping triggers...
2022-10-01T13:49:21 Dropped triggers OK.
Successfully altered `lbtest`.`person`.
You can see the different steps in the logs: The temporary table is called “_person_new”, it is altered (the column is added). The triggers are created, the data is copied and in the end, the tables are swapped.
liquibase-percona
We have seen, that we can use Liquibase to manage schema updates in our application. And we can use the command-line tool pt-online-schema-change, to perform non-locking schema updates manually. The next step is to bring these two tools together. And that’s the goal of liquibase-percona.
liquibase-percona is an extension for Liquibase. It applies the changes that are defined in the changelog by calling pt-online-schema-change. It is a drop-in extension. There are only little to no changes to the changelog necessary. It will use pt-osc if it is installed, otherwise it will use the “normal” way of updating the schema.
It lives on GitHub in Liquibase’s organization: https://github.com/liquibase/liquibase-percona
It’s also known in the Percona Community: https://percona.community/blog/2020/10/26/zero-downtime-schema-change-with-liquibase-percona/
Integration tests
The extension itself contains many integration tests, so that all changes are covered. Thanks to docker images,
the integration tests can be run locally without any effort by just running ./mvnw verify -Prun-its.
During the phase “pre-integration-test”, docker images for mysql and mariadb are started using the maven plugin io.fabric8:docker-maven-plugin. The two databases are then running in their containers and can be used for the tests.
The integration tests use maven-invoker-plugin to execute them. This allows to configure a setup task (which prepares the database) and a verify task. The tests call liquibase via its maven plugin liquibase-maven-plugin. The Percona Toolkit is downloaded automatically and placed on the PATH, so that it is available for liquibase-percona.
This setup easily allows to test various combinations of MySQL connector versions, Liquibase versions and Percona Toolkit versions.
As simple as it is running locally, it also runs on Github Actions, Github’s CI environment:
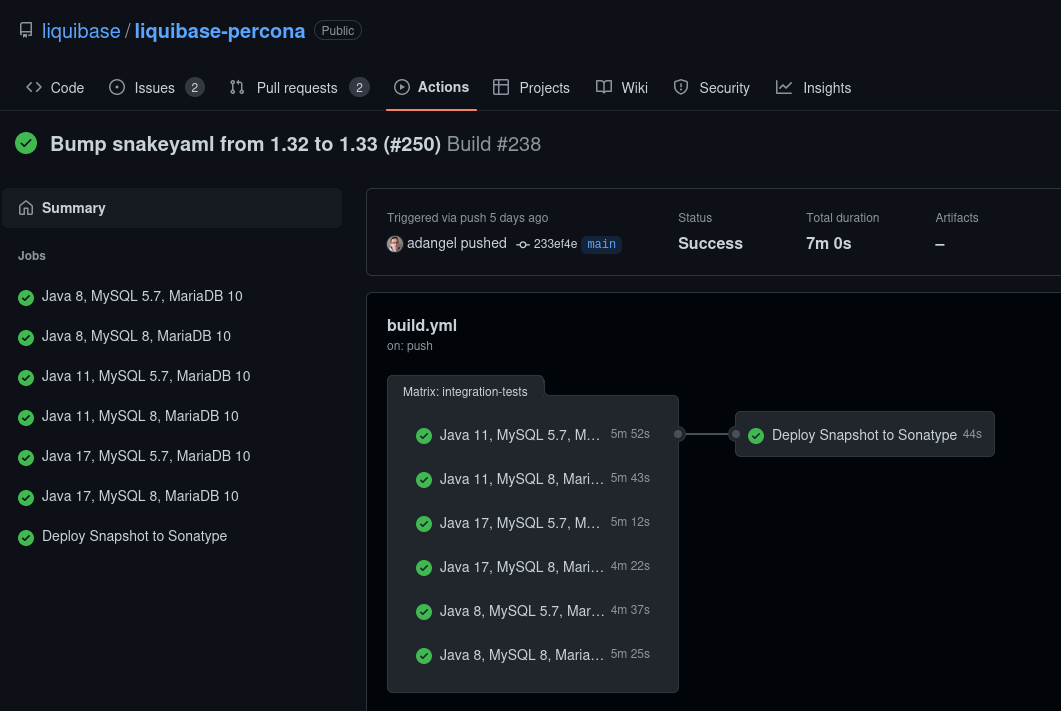
(The screenshot is from https://github.com/liquibase/liquibase-percona/actions/runs/3129251849)
Complete Example
Let’s now look at a complete example. We’ll use docker containers to run both MySQL and Liquibase with Percona Toolkit, set up a database, run a schema change and look at the results.
MySQL provides official docker images at https://hub.docker.com/_/mysql for various versions.
Liquibase also provides official images at https://hub.docker.com/r/liquibase/liquibase, however this doesn’t contain the Liquibase Percona extension nor pt-online-schema-change. Therefore we need to build an own image using the Dockerfile from https://github.com/liquibase/liquibase-percona/docker/Dockerfile.
This step is only needed once. And there are prebuilt images available at https://hub.docker.com/r/andreasdangel/liquibase-percona.
For everyone who wants to build the images manually, here are the commands:
# once: build docker image with liquibase + percona + pt-osc
$ git clone https://github.com/liquibase/liquibase-percona
$ cd liquibase-percona/docker
$ docker build -t liquibase-percona .
In the following steps, we’ll use the prebuilt variants.
Running and accessing MySQL
We will run two containers: MySQL and Liquibase. The latter needs to have network access to the MySQL database. Therefore it’s easier to create a separate network once, that we’ll use throughout the examples:
# once: network
$ docker network create mysql-network
The network “mysql-network” is now available and can be used when starting the other containers. To list the
available networks, use docker network ls. In order to delete the network, use docker network rm mysql-network.
Next step is to start MySQL. We’ll use the network “mysql-network” and provide a very secure password for the root user on the server:
# start mysql
$ docker run --name mysql-tests \
    --network mysql-network \
    -e MYSQL_ROOT_PASSWORD=my-secret-pw \
    -d mysql:latest
You can look at the logs with docker logs mysql-tests. It might take a while after the database is up and
running.
Note that we didn’t specify any volume. This means, that the MySQL server will store the databases inside the
container in /var/lib/mysql - and the data is lost, once we stop and remove the container. This is OK for our
tests and experiments.
Once MySQL is up, you can run the MySQL cli and create a database. Here we run the command mysql inside the running
container “mysql-tests”. In that case, we don’t need network access, the mysql cli will use the unix socket
to connect to the database:
# connect via cli and create schema
$ docker exec -it mysql-tests \
    mysql -uroot -pmy-secret-pw \
    -e 'drop database if exists lbtest; create database lbtest;'
mysql: [Warning] Using a password on the command line interface can be insecure.
Now we have the database lbtest created. To verify, we can list all databases:
$ docker exec -it mysql-tests mysql -uroot -pmy-secret-pw -e 'show databases;'
mysql: [Warning] Using a password on the command line interface can be insecure.
+--------------------+
| Database           |
+--------------------+
| information_schema |
| lbtest             |
| mysql              |
| performance_schema |
| sys                |
+--------------------+
If you are a more into a nice GUI for database administration, you might want to look into MySQL Workbench. This is a cross-platform tool for SQL development. Although this is a fat-client application, there is also a docker container available. Linuxserver.io created docker-mysql-workbench which can easily be used without installing anything. All you need is a browser: Inside the container, a virtual desktop is started, that is remote controlled via Apache Guacamole accessible via a web interface.
Use the following docker command, to start MySQL workbench:
docker run -d \
  --name=mysql-workbench \
  --network mysql-network \
  -e PUID=1000 \
  -e PGID=1000 \
  -e TZ=Europe/London \
  -p 3000:3000 \
  --cap-add="IPC_LOCK" \
  --restart unless-stopped \
  lscr.io/linuxserver/mysql-workbench
Now open http://localhost:3000 and connect to the mysql host “mysql-tests”.
Note: We used the network “mysql-network”, so that we can access MySQL in the first container.
The sample Liquibase changelog
Here is a complete changelog, that we are going to apply. Store this in the current working directory
using the filename sample-changelog.xml:
<?xml version="1.0" encoding="UTF-8"?>
<databaseChangeLog
        xmlns="http://www.liquibase.org/xml/ns/dbchangelog"
        xmlns:xsi="http://www.w3.org/2001/XMLSchema-instance"
        xmlns:ext="http://www.liquibase.org/xml/ns/dbchangelog-ext"
        xsi:schemaLocation="http://www.liquibase.org/xml/ns/dbchangelog http://www.liquibase.org/xml/ns/dbchangelog/dbchangelog-latest.xsd
        http://www.liquibase.org/xml/ns/dbchangelog-ext http://www.liquibase.org/xml/ns/dbchangelog/dbchangelog-ext.xsd">

    <changeSet id="1" author="JonDoe">
        <createTable tableName="person">
            <column name="id" type="int" autoIncrement="true">
                <constraints primaryKey="true"/>
            </column>
            <column name="address" type="varchar(255)">
                <constraints nullable="false" />
            </column>
        </createTable>
    </changeSet>

    <changeSet id="2" author="JonDoe">
        <addColumn tableName="person">
            <column name="name" type="varchar(50)" afterColumn="id" />
        </addColumn>
    </changeSet>

</databaseChangeLog>
The changelog contains two changesets: First the table “person” is created with two columns. The second changeset adds a new column “name”.
Then we are ready to run liquibase. First, we’ll do a complete update, that means, we just run the
liquibase command update and liquibase will make sure, that all changes described in the changeset
are applied and the database schema is updated.
$ docker run --network mysql-network --rm -v $PWD:/liquibase/changelog \
    andreasdangel/liquibase-percona \
    --url="jdbc:mysql://mysql-tests:3306/lbtest" \
    --changeLogFile=sample-changelog.xml \
    --username=root --password=my-secret-pw \
    --logLevel=info \
    update
Note: Here we are using --rm, which removes the container automatically once it is stopped which happens when
liquibase is finished. And we attach the current directory ($PWD) as /liquibase/changelog, so that
liquibase can find the changelog file sample-changelog.xml.
The output looks like this:
####################################################
##   _     _             _ _                      ##
##  | |   (_)           (_) |                     ##
##  | |    _  __ _ _   _ _| |__   __ _ ___  ___   ##
##  | |   | |/ _` | | | | | '_ \ / _` / __|/ _ \  ##
##  | |___| | (_| | |_| | | |_) | (_| \__ \  __/  ##
##  \_____/_|\__, |\__,_|_|_.__/ \__,_|___/\___|  ##
##              | |                               ##
##              |_|                               ##
##                                                ##
##  Get documentation at docs.liquibase.com       ##
##  Get certified courses at learn.liquibase.com  ##
##  Free schema change activity reports at        ##
##      https://hub.liquibase.com                 ##
##                                                ##
####################################################
Starting Liquibase at 13:14:12 (version 4.16.0 #4558 built at 2022-09-09 15:41+0000)
Liquibase Version: 4.16.0
Liquibase Community 4.16.0 by Liquibase
[2022-10-01 13:14:13] INFO [liquibase.lockservice] Successfully acquired change log lock
[2022-10-01 13:14:14] INFO [liquibase.changelog] Creating database history table with name: lbtest.DATABASECHANGELOG
[2022-10-01 13:14:14] INFO [liquibase.changelog] Reading from lbtest.DATABASECHANGELOG
[2022-10-01 13:14:15] INFO [liquibase.ext] Using percona toolkit: 3.4.0
Running Changeset: sample-changelog.xml::1::JonDoe
[2022-10-01 13:14:15] INFO [liquibase.changelog] Table person created
[2022-10-01 13:14:15] INFO [liquibase.changelog] ChangeSet sample-changelog.xml::1::JonDoe ran successfully in 165ms
Running Changeset: sample-changelog.xml::2::JonDoe
[2022-10-01 13:14:15] INFO [liquibase.ext] Executing: pt-online-schema-change --alter-foreign-keys-method=auto --nocheck-unique-key-change --alter="ADD COLUMN name VARCHAR(50) NULL AFTER id" --password=*** --execute h=mysql-tests,P=3306,u=root,D=lbtest,t=person
[2022-10-01 13:14:15] INFO [liquibase.ext] KeepAlive every 14400000 millis
[2022-10-01 13:14:15] INFO [liquibase.ext] No slaves found.  See --recursion-method if host 906d5fc1ad26 has slaves.
[2022-10-01 13:14:15] INFO [liquibase.ext] Not checking slave lag because no slaves were found and --check-slave-lag was not specified.
[2022-10-01 13:14:15] INFO [liquibase.ext] Operation, tries, wait:
[2022-10-01 13:14:15] INFO [liquibase.ext]   analyze_table, 10, 1
[2022-10-01 13:14:15] INFO [liquibase.ext]   copy_rows, 10, 0.25
[2022-10-01 13:14:15] INFO [liquibase.ext]   create_triggers, 10, 1
[2022-10-01 13:14:15] INFO [liquibase.ext]   drop_triggers, 10, 1
[2022-10-01 13:14:15] INFO [liquibase.ext]   swap_tables, 10, 1
[2022-10-01 13:14:15] INFO [liquibase.ext]   update_foreign_keys, 10, 1
[2022-10-01 13:14:15] INFO [liquibase.ext] No foreign keys reference `lbtest`.`person`; ignoring --alter-foreign-keys-method.
[2022-10-01 13:14:15] INFO [liquibase.ext] Altering `lbtest`.`person`...
[2022-10-01 13:14:15] INFO [liquibase.ext] Creating new table...
[2022-10-01 13:14:15] INFO [liquibase.ext] Created new table lbtest._person_new OK.
[2022-10-01 13:14:15] INFO [liquibase.ext] Altering new table...
[2022-10-01 13:14:16] INFO [liquibase.ext] Altered `lbtest`.`_person_new` OK.
[2022-10-01 13:14:16] INFO [liquibase.ext] 2022-10-01T13:14:16 Creating triggers...
[2022-10-01 13:14:16] INFO [liquibase.ext] 2022-10-01T13:14:16 Created triggers OK.
[2022-10-01 13:14:16] INFO [liquibase.ext] 2022-10-01T13:14:16 Copying approximately 1 rows...
[2022-10-01 13:14:16] INFO [liquibase.ext] 2022-10-01T13:14:16 Copied rows OK.
[2022-10-01 13:14:16] INFO [liquibase.ext] 2022-10-01T13:14:16 Analyzing new table...
[2022-10-01 13:14:16] INFO [liquibase.ext] 2022-10-01T13:14:16 Swapping tables...
[2022-10-01 13:14:16] INFO [liquibase.ext] 2022-10-01T13:14:16 Swapped original and new tables OK.
[2022-10-01 13:14:16] INFO [liquibase.ext] 2022-10-01T13:14:16 Dropping old table...
[2022-10-01 13:14:16] INFO [liquibase.ext] 2022-10-01T13:14:16 Dropped old table `lbtest`.`_person_old` OK.
[2022-10-01 13:14:16] INFO [liquibase.ext] 2022-10-01T13:14:16 Dropping triggers...
[2022-10-01 13:14:16] INFO [liquibase.ext] 2022-10-01T13:14:16 Dropped triggers OK.
[2022-10-01 13:14:16] INFO [liquibase.ext] Successfully altered `lbtest`.`person`.
[2022-10-01 13:14:16] INFO [liquibase.ext]
[2022-10-01 13:14:16] INFO [liquibase.changelog] Columns name(varchar(50)) added to person
[2022-10-01 13:14:16] INFO [liquibase.ext] KeepAlive thread finished
[2022-10-01 13:14:16] INFO [liquibase.changelog] ChangeSet sample-changelog.xml::2::JonDoe ran successfully in 1416ms
[2022-10-01 13:14:16] INFO [liquibase.lockservice] Successfully released change log lock
Liquibase command 'update' was executed successfully.
We see that Percona Toolkit version 3.4.0 is used and that the changeset have been executed. Note the log level is “INFO” which give a lot of output.
Now let’s verify the result. We can just look at the table lbtest.person and we should see, that is has
a column “name” as the second column:
$ docker exec -it mysql-tests \
    mysql -uroot -pmy-secret-pw lbtest \
    -e 'show tables; describe lbtest.person;'
mysql: [Warning] Using a password on the command line interface can be insecure.
+-----------------------+
| Tables_in_lbtest      |
+-----------------------+
| DATABASECHANGELOG     |
| DATABASECHANGELOGLOCK |
| person                |
+-----------------------+
+---------+--------------+------+-----+---------+----------------+
| Field   | Type         | Null | Key | Default | Extra          |
+---------+--------------+------+-----+---------+----------------+
| id      | int          | NO   | PRI | NULL    | auto_increment |
| name    | varchar(50)  | YES  |     | NULL    |                |
| address | varchar(255) | NO   |     | NULL    |                |
+---------+--------------+------+-----+---------+----------------+
We also see two additional tables: DATABASECHANGELOG and DATABASECHANGELOGLOCK. These are used by Liquibase to maintain
the status of the applied changesets (look at them: SELECT * FROM DATABASECHANGELOG).
Running a partial update (and preview remaining changes)
The most interesting changeset in our sample changelog is the second changeset - adding a column. The first changeset is just creating the table and we’ll assume now, that the table already exists, so that the only change will be adding the new column.
First, we reset the database again (drop database if exists lbtest; create database lbtest;) and then we can
run liquibase with the command updateCount 1. This will now only execute the first changeset:
$ docker run --network mysql-network --rm -v $PWD:/liquibase/changelog \
    andreasdangel/liquibase-percona \
    --url="jdbc:mysql://mysql-tests:3306/lbtest" \
    --changeLogFile=sample-changelog.xml \
    --username=root --password=my-secret-pw \
    updateCount 1
####################################################
##   _     _             _ _                      ##
##  | |   (_)           (_) |                     ##
##  | |    _  __ _ _   _ _| |__   __ _ ___  ___   ##
##  | |   | |/ _` | | | | | '_ \ / _` / __|/ _ \  ##
##  | |___| | (_| | |_| | | |_) | (_| \__ \  __/  ##
##  \_____/_|\__, |\__,_|_|_.__/ \__,_|___/\___|  ##
##              | |                               ##
##              |_|                               ##
##                                                ##
##  Get documentation at docs.liquibase.com       ##
##  Get certified courses at learn.liquibase.com  ##
##  Free schema change activity reports at        ##
##      https://hub.liquibase.com                 ##
##                                                ##
####################################################
Starting Liquibase at 13:29:16 (version 4.16.0 #4558 built at 2022-09-09 15:41+0000)
Liquibase Version: 4.16.0
Liquibase Community 4.16.0 by Liquibase
Running Changeset: sample-changelog.xml::1::JonDoe
Liquibase command 'updateCount' was executed successfully.
Now we have one changeset applied and one changeset pending. We can see this with the status command:
$ docker run --network mysql-network --rm -v $PWD:/liquibase/changelog \
    andreasdangel/liquibase-percona \
    --url="jdbc:mysql://mysql-tests:3306/lbtest" \
    --changeLogFile=sample-changelog.xml \
    --username=root --password=my-secret-pw \
    status --verbose
####################################################
##   _     _             _ _                      ##
##  | |   (_)           (_) |                     ##
##  | |    _  __ _ _   _ _| |__   __ _ ___  ___   ##
##  | |   | |/ _` | | | | | '_ \ / _` / __|/ _ \  ##
##  | |___| | (_| | |_| | | |_) | (_| \__ \  __/  ##
##  \_____/_|\__, |\__,_|_|_.__/ \__,_|___/\___|  ##
##              | |                               ##
##              |_|                               ##
##                                                ##
##  Get documentation at docs.liquibase.com       ##
##  Get certified courses at learn.liquibase.com  ##
##  Free schema change activity reports at        ##
##      https://hub.liquibase.com                 ##
##                                                ##
####################################################
Starting Liquibase at 13:33:42 (version 4.16.0 #4558 built at 2022-09-09 15:41+0000)
Liquibase Version: 4.16.0
Liquibase Community 4.16.0 by Liquibase
1 changesets have not been applied to root@172.18.0.4@jdbc:mysql://mysql-tests:3306/lbtest
     sample-changelog.xml::2::JonDoe
Liquibase command 'status' was executed successfully.
So we have 1 changeset that has not been applied. It is “sample-changelog.xml::2::JonDoe”.
Now let’s preview what would be changed if we ran the remaining changeset. This can be done using the
command updateSQL instead of update:
$ docker run --network mysql-network --rm -v $(pwd):/liquibase/changelog \
    andreasdangel/liquibase-percona \
    --url="jdbc:mysql://mysql-tests:3306/lbtest" \
    --changeLogFile=sample-changelog.xml \
    --username=root --password=my-secret-pw \
    updateSQL
####################################################
##   _     _             _ _                      ##
##  | |   (_)           (_) |                     ##
##  | |    _  __ _ _   _ _| |__   __ _ ___  ___   ##
##  | |   | |/ _` | | | | | '_ \ / _` / __|/ _ \  ##
##  | |___| | (_| | |_| | | |_) | (_| \__ \  __/  ##
##  \_____/_|\__, |\__,_|_|_.__/ \__,_|___/\___|  ##
##              | |                               ##
##              |_|                               ##
##                                                ##
##  Get documentation at docs.liquibase.com       ##
##  Get certified courses at learn.liquibase.com  ##
##  Free schema change activity reports at        ##
##      https://hub.liquibase.com                 ##
##                                                ##
####################################################
Starting Liquibase at 13:36:56 (version 4.16.0 #4558 built at 2022-09-09 15:41+0000)
Liquibase Version: 4.16.0
Liquibase Community 4.16.0 by Liquibase
--  *********************************************************************
--  Update Database Script
--  *********************************************************************
--  Change Log: sample-changelog.xml
--  Ran at: 10/1/22, 1:36 PM
--  Against: root@172.18.0.4@jdbc:mysql://mysql-tests:3306/lbtest
--  Liquibase version: 4.16.0
--  *********************************************************************

--  Lock Database
UPDATE lbtest.DATABASECHANGELOGLOCK SET `LOCKED` = 1, LOCKEDBY = 'f140a181aa8c (172.18.0.4)', LOCKGRANTED = NOW() WHERE ID = 1 AND `LOCKED` = 0;

--  Changeset sample-changelog.xml::2::JonDoe
--  pt-online-schema-change --alter-foreign-keys-method=auto --nocheck-unique-key-change --alter="ADD COLUMN name VARCHAR(50) NULL AFTER id" --password=*** --execute h=mysql-tests,P=3306,u=root,D=lbtest,t=person;

--  Instead of the following statements, pt-online-schema-change will be used;

ALTER TABLE lbtest.person ADD name VARCHAR(50) NULL AFTER id;

INSERT INTO lbtest.DATABASECHANGELOG (ID, AUTHOR, FILENAME, DATEEXECUTED, ORDEREXECUTED, MD5SUM, `DESCRIPTION`, COMMENTS, EXECTYPE, CONTEXTS, LABELS, LIQUIBASE, DEPLOYMENT_ID) VALUES ('2', 'JonDoe', 'sample-changelog.xml', NOW(), 2, '8:536fb4438bcd477b20e98bf0d0d7892c', 'addColumn tableName=person', '', 'EXECUTED', NULL, NULL, '4.16.0', '4631417975');

--  Release Database Lock
UPDATE lbtest.DATABASECHANGELOGLOCK SET `LOCKED` = 0, LOCKEDBY = NULL, LOCKGRANTED = NULL WHERE ID = 1;

Liquibase command 'updateSql' was executed successfully.
Note: You can redirect stdout into a file to only have the SQL statements. The log output is against stderr.
In the log output, we see the command line for pt-online-schema-change that would be used. And the original SQL statement.
Having this information, we can also run pt-online-schema-change manually. Running it this way, we would bypass Liquibase, so
Liquibase wouldn’t know that the column “name” has been added already (no entry in DATABASECHANGELOG). Hence we use
additionally the option --dry-run instead of --execute to not run execute the update:
$ docker run --network mysql-network --rm \
    andreasdangel/liquibase-percona /usr/local/bin/pt-online-schema-change \
    --alter-foreign-keys-method=auto --nocheck-unique-key-change \
    --alter="ADD COLUMN name VARCHAR(50) NULL AFTER id" \
    --password=my-secret-pw \
    --dry-run --print \
    h=mysql-tests,P=3306,u=root,D=lbtest,t=person
Operation, tries, wait:
  analyze_table, 10, 1
  copy_rows, 10, 0.25
  create_triggers, 10, 1
  drop_triggers, 10, 1
  swap_tables, 10, 1
  update_foreign_keys, 10, 1
No foreign keys reference `lbtest`.`person`; ignoring --alter-foreign-keys-method.
Starting a dry run.  `lbtest`.`person` will not be altered.  Specify --execute instead of --dry-run to alter the table.
Creating new table...
CREATE TABLE `lbtest`.`_person_new` (
  `id` int NOT NULL AUTO_INCREMENT,
  `address` varchar(255) NOT NULL,
  PRIMARY KEY (`id`)
) ENGINE=InnoDB DEFAULT CHARSET=utf8mb4 COLLATE=utf8mb4_0900_ai_ci
Created new table lbtest._person_new OK.
Altering new table...
ALTER TABLE `lbtest`.`_person_new` ADD COLUMN name VARCHAR(50) NULL AFTER id
Altered `lbtest`.`_person_new` OK.
Not creating triggers because this is a dry run.
-----------------------------------------------------------
Skipped trigger creation:
Event : DELETE
Name  : pt_osc_lbtest_person_del
SQL   : CREATE TRIGGER `pt_osc_lbtest_person_del` AFTER DELETE ON `lbtest`.`person` FOR EACH ROW BEGIN DECLARE CONTINUE HANDLER FOR 1146 begin end; DELETE IGNORE FROM `lbtest`.`_person_new` WHERE `lbtest`.`_person_new`.`id` <=> OLD.`id`; END
Suffix: del
Time  : AFTER
-----------------------------------------------------------
-----------------------------------------------------------
Skipped trigger creation:
Event : UPDATE
Name  : pt_osc_lbtest_person_upd
SQL   : CREATE TRIGGER `pt_osc_lbtest_person_upd` AFTER UPDATE ON `lbtest`.`person` FOR EACH ROW BEGIN DECLARE CONTINUE HANDLER FOR 1146 begin end; DELETE IGNORE FROM `lbtest`.`_person_new` WHERE !(OLD.`id` <=> NEW.`id`) AND `lbtest`.`_person_new`.`id` <=> OLD.`id`; REPLACE INTO `lbtest`.`_person_new` (`id`, `address`) VALUES (NEW.`id`, NEW.`address`); END
Suffix: upd
Time  : AFTER
-----------------------------------------------------------
-----------------------------------------------------------
Skipped trigger creation:
Event : INSERT
Name  : pt_osc_lbtest_person_ins
SQL   : CREATE TRIGGER `pt_osc_lbtest_person_ins` AFTER INSERT ON `lbtest`.`person` FOR EACH ROW BEGIN DECLARE CONTINUE HANDLER FOR 1146 begin end; REPLACE INTO `lbtest`.`_person_new` (`id`, `address`) VALUES (NEW.`id`, NEW.`address`);END
Suffix: ins
Time  : AFTER
-----------------------------------------------------------
Not copying rows because this is a dry run.
INSERT LOW_PRIORITY IGNORE INTO `lbtest`.`_person_new` (`id`, `address`) SELECT `id`, `address` FROM `lbtest`.`person` LOCK IN SHARE MODE /*pt-online-schema-change 1 copy table*/
Not swapping tables because this is a dry run.
Not dropping old table because this is a dry run.
Not dropping triggers because this is a dry run.
DROP TRIGGER IF EXISTS `lbtest`.`pt_osc_lbtest_person_del`
DROP TRIGGER IF EXISTS `lbtest`.`pt_osc_lbtest_person_upd`
DROP TRIGGER IF EXISTS `lbtest`.`pt_osc_lbtest_person_ins`
2022-10-01T13:41:59 Dropping new table...
DROP TABLE IF EXISTS `lbtest`.`_person_new`;
2022-10-01T13:41:59 Dropped new table OK.
Dry run complete.  `lbtest`.`person` was not altered.
Since we used the option --print, we actually see the SQL statements and triggers that pt-osc would execute.
By the way, error code 1146 means ER_NO_SUCH_TABLE.
That’s all for the example section.
(To shutdown and remove your docker containers: docker stop mysql-workbench mysql-tests; docker rm mysql-workbench mysql-tests)
Database refactoring
To bring all this - the database schema updates - into a broader context, I want to mention the book “Refactoring Databases”. It describes patterns on how to change the schema of an existing database in order to improve the design. Very similar like code refactoring. The goal is to improve the design and to avoid any behavioral change.
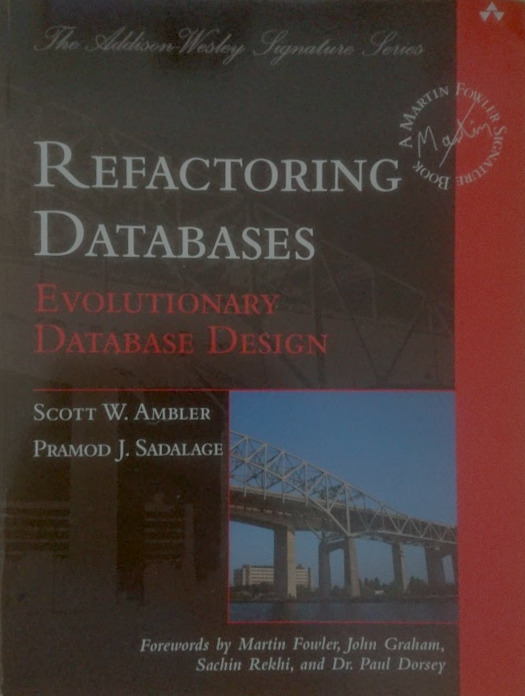
Refactoring Databases - Evolutionary Database Design
by Scott Ambler and Pramod Sadalage
ISBN: 978-0-32129-353-4 (2006)
It’s also about doing only small changes and improve the database design step by step.
As an example, let’s not add a new column this time, but rename a column. Let’s assume we have a column named “fName” and we want to rename it to “firstName”, so that the data itself is easier to understand. We want to achieve this without disrupting our business. Therefore, the whole process for renaming a column takes multiple steps:
- Service V1 is running. It uses the column name “fName” for accessing the data.
- As always, when you are about to modify the database, create a backup first and run your DB regression tests to make sure, that the data is valid before you change it.
- Add new column “firstName” with pt-online-schema-change.
- Copy the data from the old column (
UPDATE ... SET firstName = fName). - Add synchronization triggers (insert and update)
- if only “firstName” is given or modified, use that for “fName”
- if only “fName” is given or modified, use that for “firstName”
- Run DB regression tests to ensure everything is still good. Now we have the new column “firstName”, which contains the same data like “fName”. But it is not used yet.
- Update the service V1 -> V2
- During transition: both columns might be used. The service could use both columns, since both columns are equivalent. But eventually you want to update to a service version, that only uses the new column “firstName”, so that we can remove the old column.
- In this example, V2 only uses new column “firstName”
- If you aim for a zero downtime upgrade, you might have running both V1 and V2 of your service in parallel. Eg. you might use a load balancer pool with mix of V1 and V2 and do a blue/green (or A/B) deployment.
- Once only services with V2 are running, another schema update can be run: drop the triggers and finally remove the old column “fName”.
Pitfalls and surprises
If you have multiple applications that use your database and not just one service, the transition period might be very long. In the above example, the transition period is the time, when both columns (“fName” and “firstName”) can be used by applications. You can only remove the old column once every application has been updated. Maybe you don’t know exactly all applications that access the database. In that case, you’d need to configure some logging on the database side to see, if the old column is still accessed at some time. If it is not accessed anymore for a while, you can assume, that all applications are migrated.
Another point to keep it mind is the additional load that copying columns or whole tables (in case of pt-online-schema-change) adds to the usual load of your database. Additionally, for bigger installations you usually have multiple replications of your master instance to multiple slave instances to distribute the load. You’d run pt-online-schema-change on the master, but it might take a while until the changes are replicated to the slaves. And the slaves need to copy the tables as well. So there might be a replication lag.
Since the schema updates for big databases might be running very long, you might run into timeout issues. Maybe you need to adjust your connection settings or enable some keep alive mechanism (see also #106).
A similar issue might arise with the number of connections. Your applications usually use connection pools and you know how many instances and so on. But applying a database schema update adds additional connections: Liquibase itself needs a connection and pt-online-schema-change needs another.
It might not always be possible to use pt-online-schema change, e.g. because of already existing triggers. However
this shouldn’t occur anymore that often. Since MySQL 5.7.2 the option --preserve-triggers can be used.
But even if the database update is good prepared and done often, there might still be surprises. One example here is the GitHub outage in 2021.

You can read the summary in GitHub’s blog: https://github.blog/2021-12-01-github-availability-report-november-2021/
Here are some quotes:
Schema migrations are a common task often take weeks to complete
That’s what is meant with the transition period. Can take very long…
final step … [is] rename … [table]
Sounds familiar…
read replicas entered a semaphore deadlock
That’s the unfortunate surprise which lead to the outage. The outage was also cascading, since more and more read replicas where out of order which increased the load on the remaining replicas which then started to fail as well.
But there are other interesting details about the MySQL cluster at GitHub: They have a primary node for write traffic and they use multiple read replicas for production traffic. Several replicas are used to serve internal read traffic for backup and analytics.
Summary
To wrap this up, here are the main points:
- It’s easy to get started with database updates using liquibase and pt-online-schema-change
- Database and software need to be compatible, hence the transition period.
- Zero downtime takes some effort and doesn’t come for free.
- Make sure to always create backups (and verify them)
- Always test the update (with a real/complete dataset). Because it’s important to know in advance, how long the update will take.
- Monitor your service to see problems as early as possible.
References
- https://www.liquibase.org/
- https://docs.percona.com/percona-toolkit/pt-online-schema-change.html
- https://github.com/liquibase/liquibase-percona
- https://docs.liquibase.com/workflows/liquibase-community/running-liquibase-percona-toolkit-changes.html
- https://www.percona.com/blog/2014/11/18/avoiding-mysql-alter-table-downtime/
- https://medium.com/practo-engineering/mysql-zero-downtime-schema-update-without-algorithm-inplace-fd427ec5b681 (2017-12-29)
- https://percona.community/blog/2020/10/26/zero-downtime-schema-change-with-liquibase-percona/
- https://dev.mysql.com/doc/refman/8.0/en/innodb-online-ddl.html
- https://docs.linuxserver.io/images/docker-mysql-workbench
- https://www.databaserefactoring.com/
- https://github.blog/2021-12-01-github-availability-report-november-2021/
Comments
Michael
Hi there everyone, it's my first go to see at this site, and piece of writing is genuinely fruitful for me, keep up posting such articles or reviews. Feel free to surf to my webpage :: database
Leave a comment
Your email address will not be published. Required fields are marked *. All comments are held for moderation to avoid spam and abuse.